Step by Step Guide to Building a Minimum Viable Product (MVP) Test
Part 1 of 5 Part Series on testing your MVP
I was planning on giving a “Financial Model for Founders” talk at Seattle Startup Week (#SSW2016) in November. As I worked on the presentation, the final version is here on Slideshare, I realized that  making this less conceptual and abstract the better so I wanted to use an very tangible example. What’s I’ve outlined below in Part 1 is are the Lean Startup Steps you can follow to test your hypothesis.
How do you define Viable? Well, that depends on you as a founder. You may want to create a massive unicorn business at one end of the spectrum or some passive income at the other end. The definition is that your business is “capable of working successfully; feasible”.

This is the actual case study that I’m using to launch VentureReadyModels.com, a site that I have built to provides resources for startups, it starts by outlining the business models options for tech and internet companies. Though the principals for marketing and sales apply to regular business as well, just start with the Commerce model. Finally I provided the template versions of the Excel Financial Models that map s to the specific business models.
When I do startup events, I often get questions about how to test early startup MVP before investing any real money (let’s say $10k) into the startup and definitely before writing a single line of code. This is the definition of “Lean”, doing tests on the cheap to prove if anyone cares about your idea. This is also consistent for the business founders that lacks a technical co-founder to build a mobile app or web app. You’re going to start with traffic and interest.
Here’s the answer to the question in step-by-step format with links to outside resources if you need some guidance along the way.
I’ve broken this series into five parts:
- Website Setup
- Keyword Brainstorming
- First Data Driven Decision
- Optimizing and Going Forward
- Additional Resources
Each part will also have a Part B – Results and Lessons Learned to follow up on what worked and didn’t work.
Part 1 – Website Setup
- Start with your concept/hypothesis or Domain Name
- What idea is it that you want to test? For me, the test was if people that read my blog on a monthly basis for business models would be interested in purchasing a $99 – price testing to come later in the sequence – for a Startup Financial template based on their business model?
- Given the number of times I’ve given this talk to various groups and accelerators – I knew there was demand, I just didn’t know how much demand, I just didn’t know if anyone would pay for it!
- What/Who are the competitors for this hypothesis?
- Build a list of competitive sites
- Do you have a domain name that you want to use for the test? Does the domain name include any of the keywords that you want to test? You don’t need to buy an expensive or “perfect” domain name here. Test first, if you get a great name that you can spend $100’s or $1,000’s of later that’s ok. Go to Name.com to buy a domain, consider a .co as an option. Domains with .com has historically been a preference, but keywords are likely more valuable than the extension at this point for your test.
- Is it worth testing the hypothesis? Well, I had a deadline to meet and a Sunday afternoon with a Football game on in the background. So over the three hours that followed here’s what I did:
- What idea is it that you want to test? For me, the test was if people that read my blog on a monthly basis for business models would be interested in purchasing a $99 – price testing to come later in the sequence – for a Startup Financial template based on their business model?
- Now launch the Website
- 14 day free trial of CloudWays
- With this service you pay based on usage and you can test multiple domains vs. purchasing a single WordPress.com annual contract of $99 + domain mapping for $13. This is a mistake I made early in this process… technically a hosted WordPress.org site uses the same Dashboard and you can test multiple ideas for an inexpensive price point. Plus you can do nested and numbered lists like this without touching the HTML (total pet peeve).
- 14 days is a good test for you to get the site up and optimized with content for Search Engine Optimization (SEO). SEO takes time to build so your brand new site won’t be driving traffic in day one, but you need to get it started, so get to work.
- Cloudways Server setup
- Name your server – use your last name for now.
- Start with the basic settings – single CPU and minimum storage
- Add an Application
- Choose between
- Startup with a Single Site WordPress install or –
- If you have a product to sell – this is the one I used because I knew I had at least four versions of a Excel Spreadsheet that I could sell install the Application Commerce on WooCommerce
- If you’re going to sell a downloadable, virtual or physical goods, you can install a WooCommerce site at setup
- You’ll need to input your products, names, descriptions, prices and
- Cloudways will assign your default email and Password for the account – it’s easy to hover over and copy.
- Choose between
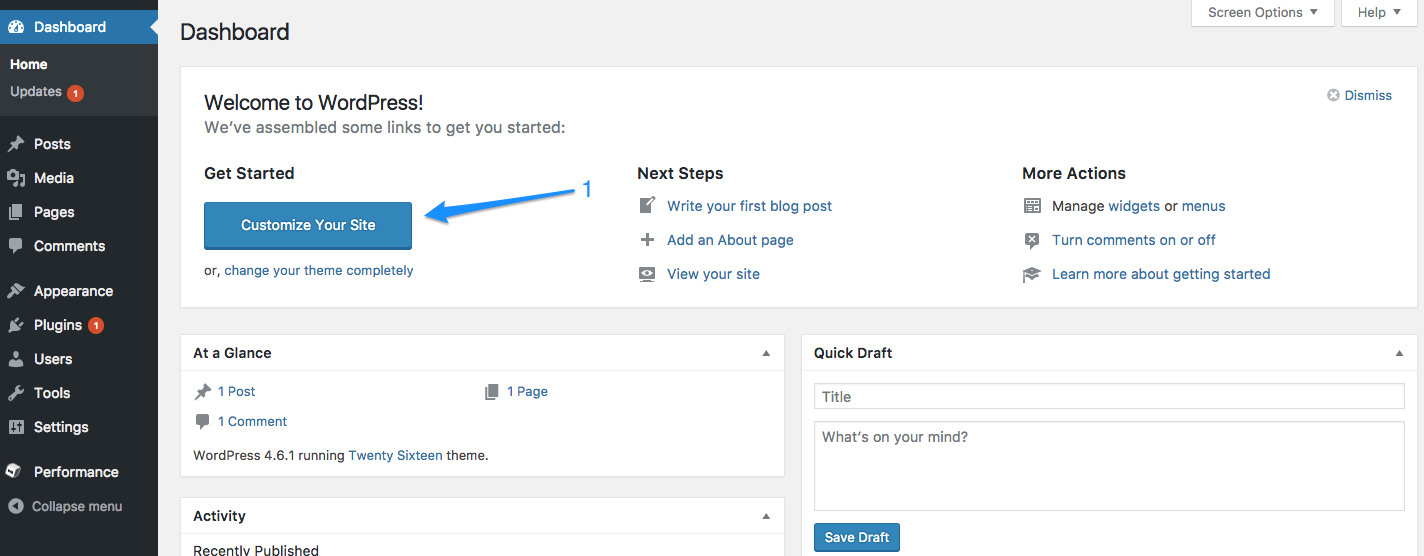
- Configure WordPress
- 14 day free trial of CloudWays

- Customize your Site
- Theme – if you’re going to finish this project during a football game, go with the default theme. Right now it’s called Twenty Sixteen. There are a ton of free and paid Themes available. You can come back to this later.
- Site Identity – Use your domain name and keywords
- Images – come back to this later – you can spend hours looking for the perfect photo on iStockPhoto or Site Icon
- Configure WordPress site plugins. Plugins can be downloaded from inside the WP app – “Add New”
- SumoMe – this will allow you to test popup and build your lists, there is a free version you can use for the test. It’s limited, but go build some traffic and buy the paid subscription – see additional info below
- You need to startup building an email list – so go to MailChimp and setup a free Account for now. If you are going to use email automation – e.g. forwarding a five part email to remind people how to use your product – you’ll need a paid account. More later on that topic.
- Jetpack – allows you to track traffic on the WordPress site
- Yoast SEO – shows you where you can improve your content to have it better indexed for Google. Configuring your site for SEO is a topic that will go past the Football game timelines – see more below.
- Add Content to your site in two types Pages and Posts – you can visit my site here to see the final version. Pages use navigation, Posts are generally Blog content.
- All of the Pages that I started with during the football game – other pages were added later after looking at competitive sites
- Home – some of this content was pulled from DKParker.com/Blog to make the pace of copying and pasting faster – writing content will take time if you haven’t already started
- Business Models – base level content for the site. Greater than 300 words per page
- Shop
- Added the first Subscription Model spreadsheet
- Posts – I simply pointed this site to my other blog above vs. copying and pasting content. During the football game, no additional content was created
- Redirect your domain name/URL to the site – this was a little tricky because the description wasn’t great and I only do DNS/CName type of work once every year or so…
- It was easy to add a CNAME change to my Name.com account – the DNS servers needed to stay in the default setting.
- If you have trouble at any point in the setup you can use the Live Chat that is provided in the top right
- All of the Pages that I started with during the football game – other pages were added later after looking at competitive sites
- Submit your URL to Google URL Submit
- Download and install the WordPress Mobile App for your smartphone to monitor your site(s)
- You should be at Half Time and ready for an adult beverage! If you spent too much time on theme or photos you’re likely into the fourth quarter!
Go right your first blog post and tell people why you think this is a great idea! Share it on social media, you can go get the social media profiles for your new product later